This Case Does EVERYTHING – Lian Li O11 Mini Review

Share:
Table of contents
I’m sure you are excited for the Lian Li O11 Dynamic Mini, and the reason for that is because the bigger brother, the original O11 Dynamic was our case of the year back in 2018. Lian Li has been rolling out some fantastic cases over the last little while, and this one is no exception.
Price & Size


You are looking at a $99 USD enclosure that can morph to your system configuration, whether it be an Mini-ITX extreme water cooling system, a slightly more niche Micro-ATX direction, or even sticking to traditional ATX form factor, this case can accommodate all three. The most impressive thing about this case would be the size, form factor wise you are looking at something that is not taller than my Corsair ONE Mini-ITX tower. Compared to a standard mid-towner obviously it is slightly chunkier in width, but in terms of height and length this enclosure is super competitive. Lian Li have managed to minimize footprint space while still being able to fit all types of enthusiast hardware inside of it. I have worked with this case for the last couple of days, trying to get an understanding of what it’s capable of, and who exactly it’s for, so I hope you enjoy this review.


First I want to get the conversation about price out of the way, because at $99 USD it’s not meant to compete with your high airflow performance enclosures. This thing is all about water cooling with that cool dual glass design. It’s half aesthetics, half hardware compatibility and support. When you compare the O11 Dynamic Mini against other airflow enclosures don’t expect it to perform similarly because in terms of GPU and CPU temperatures it’s really nothing special in my regular configuration.
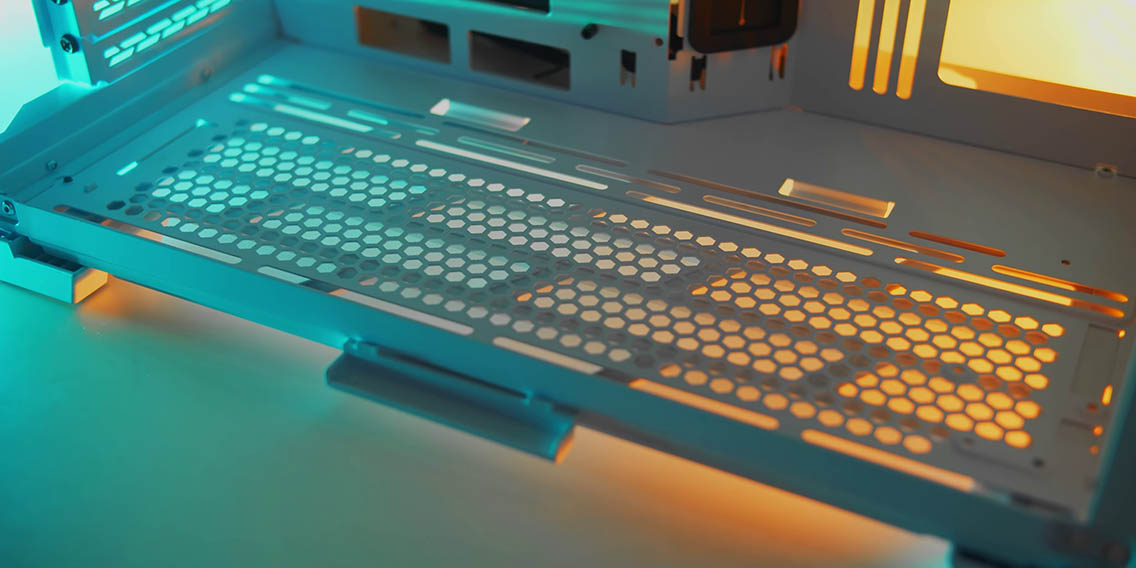
Fans & Filters


Also the fact that this case does not come with any fans means I had to populate some Noctua fans in there just to move some air, so that is kind of a downside. However, you aren’t buying this for its ability to move a lot of air. This case can support a super tall 170mm CPU tower heatsink and massive GPUs because of all that available space.


Quality wise you are looking at a pretty nice finish on the outside, with two aluminum panels and two glass panels. There is a grey aluminum section at the front on the white model that is replaced with a tempered glass section on the black model. You do have two colour choices, but I will say that the white finish on this enclosure doesn’t feel premium, it just feels like steel. I only realized that it was aluminium when my magnetic dust filters did not stick there. You can actually see that there are steel or metal strips that are attached to the side panels that hold your dust filters otherwise they don’t stick. Speaking of dust filters, there is a removable fine dust filter at the bottom that is removed from the side. This filter is meant to cover your intake area, which is nice because it is very fine. unlike the standard coarse magnetic and flexible dust filters on the sides and the top.
Connectivity & Front Panel


The I/O is pretty standard here with dual USB 3.0 Type-A ports, one USB 3.1 Type-C Gen2 port, a combo audio jack, and an illuminated power button. I appreciate the layout so you can fit more things without them interfering with each other. One quality of life improvement with the Mini are the feet, they are now spreading into each corner giving you a space to actually grab the case by the bottom. Accessing the case is identical to what we saw with the original, you remove the top panel and simply slide the glass panel upwards. They all connect with the little hinges and tabs into the frame, so they are not going to go anywhere but you have to be careful not to like accidentally remove the top panel and forget to remove the glass because they will slide out if you were to lift the case.
Aesthetics & Insides


Now in terms of finer details with this case, I have to subtract a few points. For example, the dust filter on the side has a massive handle, it is very visible, and it does not match the front of the enclosure. Same thing with the cutout on the feet to accommodate that dust filter. The ventilation pattern is all over the place. We have honeycomb, we have circles, and we have an angular one on the dust filter. This would not be the case that I would display sideways just because of all the visible large thumbscrews at the rear. The frame itself is steel and it loses a bit of its rigidity when you remove the side panels. It does flex quite a bit, which is not a big concern, but is still worth mentioning.


Looking on the inside you can tell this as an evolution of the O11 series, we still have a lot of the similarities to the original, like the dual chamber design. The motherboard mounting area is slightly extended giving you that angled area with the grubber grommets for cables to exit cleanly. The space behind the motherboard tray is that second chamber where you install your SFX or SFX-L power supply, and there is a hard drive cage with two caddies that can lock with a thumbscrew.
Highly Modular


In terms of cooling, this is where the O11 series really shines. You can do a 360mm at the bottom, 360mm at the top, and up to a 280mm on the side. For that side radiator mount you can do fans outside of the frame, so closer to the side panel and have a thicker radiator on the inside of the main chamber. Everything is on strips to give you the most flexibility for radiator and fan mounting, but it’s only when you look at the back you realize just how modular this case is. That is because the entire rear section is modular with plates that are all secured with thumbscrews for easier installation and modularity. That allows you to convert the interior of this O11 Dynamic Mini into a 7 slot, 5 slot, or 3 slot PCIe design. I would say for Mini-ITX systems this is the most useful because you can have the motherboard in the middle giving you plenty of room at the bottom for radiator clearance and at the top as well.
Mini-ITX Configuration


For example, in my Mini-ITX 3 PCIe slot configuration you can see just how much room you have above the motherboard for all your radiator and fan setups. There is still clearance at the bottom below the graphics cards for a set of fans, even though I’m using almost a 3-slot GPU. Lian Li has tried to make sure the process of reconfiguring the motherboard tray is as easy as possible, so all your motherboard standoffs on the motherboard tray are labeled 7, 5, or 3 to highlight which holes are for which configuration. Make sure that all the notches on these removable plates are actually inserted into the frame when they are fully installed, otherwise they might bulge. Lian Li actually includes these backplate brackets that are installed above the motherboard I/O.


In case the GPU overlaps with the side radiator mount don’t worry you can still mount a traditional 25mm radiator in that spot and still have plenty of room to spare. This case is definitely targeted towards water cooling, not particularly Mini-ITX, although I think that’s the direction most people should take because of all that available radiator clearance and the fact that there are 3 water pump brackets included.
Full-size ATX Configuration


For ATX users who love the design, the footprint, and don’t want to go with the slightly larger O11 dynamic, this is still a pretty decent choice, especially because you actually have better CPU tower clearance than in the original O11. With that motherboard extension installed it does actually cover up the rubber grommets, and it actually looks a bit cleaner and it does not interfere with all your cable exits.


In terms of fan placement I have one at the bottom for intake for of the GPU, one on the side for intake, and one for rear exhaust. This is based on my optimal air flow configuration that I tested with the old O11 Dynamic. You have seen the temperatures already, they are not fantastic for an airflow configured system versus basically everything else that is available that is very much airflow focused. However, this case with an all-in-one cooler on the side or the top would perform really well.


I would say storage is a slight limitation with the Mini, just because we have the 2 drive caddies and 2 SSD mounts on the cable cover. That would cover up some of the cables, but I don’t like mounting SSDs that way just because it requires a bit more work when you have to remove it. I had prefer the SSDs and storage to be separate from everything else you have to route in terms of cables.
Conclusion


Overall, what I feel like Lian Li has done here is actually quite impressive. You can build a Mini-ITX system with tons of crazy water cooling stuff in or you can go Micro-ATX and still have top and bottom clearance for a radiator. If you’re really ambitious like me you can just populate it with a full-size ATX motherboard and have a really pretty compact ATX enclosure. It is not very tall, but it is wider than your standard mid-tower, and it can still accommodate all your crazy enthusiast hardware. The whole modularity aspect is pretty straightforward from a user experience standpoint so you can easily relocate parts based on your needs.


This being a semi showcase PC enclosure in terms of like having glass in the front and the side you can do all types of cool stuff with lighting or just create a really clean build. It is not like we are going back to the early tempered glass days, because this case is designed for both looks and cooling, but you have to just face the fact that it’s not going to be performing as well as an airflow-focused enclosure. I still appreciate the fact that we have something smaller that can still accommodate full ATX hardware except for an SFX power supply. Let me know what you think of the Lian Li O11 Dynamic Mini.
Buy items in this review from Amazon at the links below:
Lian Li O11 Mini – https://geni.us/O11MINI
Lian Li O11 Dynamic – https://geni.us/PCO11D